500-word Reflective Evaluation

Seeing was a great introduction to the fundamentals of photography and basic functioning of a camera itself. It was so easy for me to understand and we always were given live briefs which helped me to practice a lot and clarify all the doubts I had during the sessions. At this point in the course, I wasn’t good at editing. My submission for this part of the module was okay but not great due to lack of editing skills; I didn’t do any colour correction, I didn’t know how to adjust exposure, sharpen, etc.

A day in the life was a great project. My struggle was to find a subject that agrees to do this with me. I approached a lot of people who turned me down. But eventually, I got a subject to agree with, where we are still friends. My subject was a drag queen which for me was fascinating. Since its set in a bar, the lighting was quite low which was challenging for me and I struggled a little, but the images came out pretty good. A low-light and night photography session might have been helpful. Introduction to the 5-picture story gave me ideas on how one event can be taken in different ways, it broadened up my perspectives. My favourite part of this part of the module was that we got introduced to a lot of photographers and photojournalists who did longer projects, where we also end up doing a presentation on one among them. It gave me an insight into how the professionals work. Looking through their contact sheets gave me a gist on their thought process of why they chose a certain image of all the shots. I wish we had a presentation on our own projects which might have been a bit stimulating. And at this point, my editing skills have gone better, as I was always practising after getting feedback for my seeing submission.

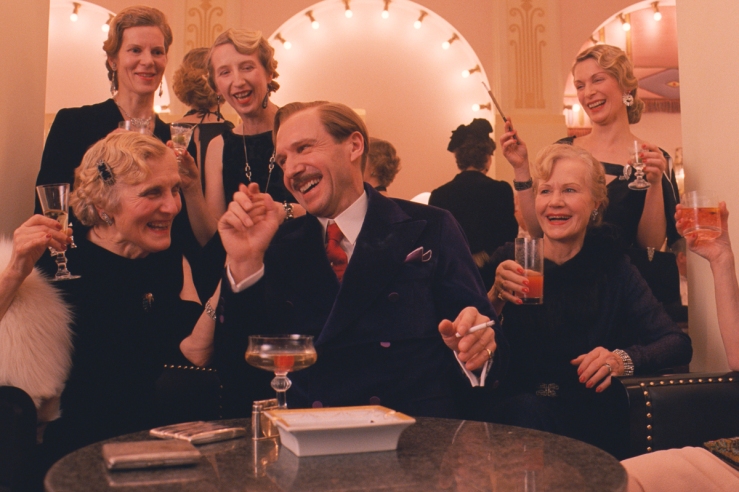
My favourite hand-in so far is the portraiture. It was a great experience; to learn studio lighting in and outdoors, using modifiers and taking pictures of more strangers, which I thought would be challenging, was actually not that challenging. I also learnt how to analyse and guess the lighting by just looking at the portraits of well-reputed photographers. My photography skills, editing skills and even my interpersonal skills with strangers have gone better than the narrative submission.

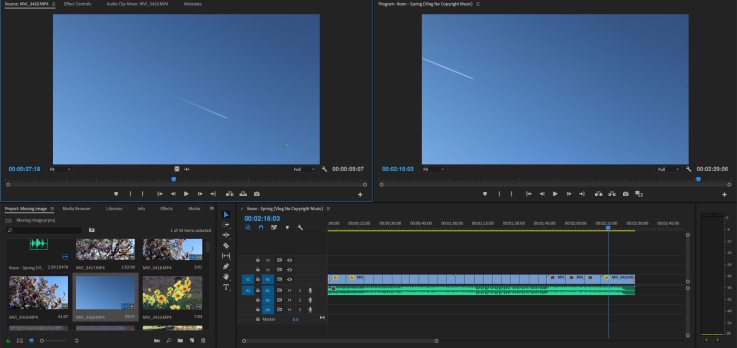
Moving image was surprisingly fascinating for me. Apart from a lot of time consumption for post-production, I quite enjoyed it. The idea of spending hours, putting together, sequencing and trim to the background music was never appealing to me. But I end up doing more practising of moving images just in my smartphone just to get a grasp of it. Workshops were extremely useful apart from the fact that it was too slow-paced.

As for someone with less to no experience with professional photography and has not utilized a camera to its fullest potential in the beginning of the course, this module has helped me to engage into key fundamentals of photography from seeing, to communicating and working with people who are complete strangers and to sequencing of visual stories with both stills and moving images. I am satisfied with what I have learnt in this module and will be practising more to be a better photographer.

Moving Image: Final

Before shooting, I went to Bute Park and while listening to the music piece multiple times to get an idea on how to shoot and sequence the final piece.

From all the workshops and briefs, I have had a thorough idea of what I am shooting. I wanted it to be something I enjoy to do whenever I got to Bute Park; admiring the nature, being laidback and peaceful surroundings. I shot every element in the park; nature, the trees, the flowers and the wildlife. I manually focused on every clip.

Editing

Screenshot 2019-05-02 at 09.07.15

I kept editing to the minimum; just simple cuts when the music changes/ends.

Screenshot 2019-05-02 at 09.07.45

I have tried slowing down and speeding up the speed in a couple of clips. Other than that I haven’t done much since this is not a fast-paced piece, Too much editing might be a distraction.

Final Submission:


Ideas

I came to the conclusion that I would do a music-inspired video set within Cardiff based on Spring and clear sky, as the cloudy days are (almost) over.

BeFunky-collage

My idea of a moving image piece is going to create a sequence based on the movement by nature; it could be movement of leaves and flowers due to wind or squirrels climbing along the tree. There will be no panning shots or any other camera movement. I will be implementing the 5 different shots which we learned during the narrative.


Music

As I am focusing on music/sound based film, I started looking for a piece which is Royalty Free. Royalty–free refers to the right to use copyright material or intellectual property without the need to pay royalties or license fees for each use, per each copy or volume sold or some time period of use or sales.

I am also looking for something that is instrumental and upbeat since my theme is based on Spring.

I looked through Youtube’s Audio Library to check out copyright free music that is primarily used by YouTube Content Creators.

I also went through websites such as BenSound.

Screenshot 2019-05-02 at 12.13.45

I wasn’t completely impressed with BenSound. So I went back to youtube and typed Spring in the search bar and found this music which is Copyright free.

I chose Spring by Ikson. Ikson is a Swedish music producer/remixer who dedicates all his work for content creators to tell their stories. He has also mentioned how to credit his work on the platform we are using his work.


Video Inspirations

Since my focus is based on spring and flowers, I did some research on spring-based music videos

Premier Pro Workshops

As someone with no clue what Premier Pro was, all the workshops helped me a lot.

Screenshot 2019-05-02 at 11.19.07Screenshot 2019-05-02 at 11.19.18Screenshot 2019-05-02 at 11.19.31Screenshot 2019-05-02 at 11.19.39

On our first workshop, we learnt the basic tools of the software and how to use them. We learned basic editing and trimming to the dialogues and actions and cutting out the extra parts and sequencing them.

Screenshot 2019-05-02 at 12.29.00

We did a workshop on a skateboarding video with electronic background music. This workshop helped me to slow down, speed up, jump cut, and add effects, such as zoom in and zoom out; and edit with respect to the given music. This gave a glimpse on how to time the video footage for the background music. We were just given 15 minutes and after the time is up we moved to someone else’s mac and continue editing theirs. This gave me an idea on other’s editing thoughts and made me realize how the same footage can be edited in different ways.

We also had another workshop on editing the scream from the movie Psycho. We again had 15 minutes to edit this. We also got to see what others have created, again giving me an idea of how one footage can be made in so many ways.


Research

Cinematography

Cinematography is an essential part of filmmaking. It’s about creating visuals that reinforce a narrative and give the audience an emotional experience. It’s less about the equipment you use and more about how you use it.

A cinematographer or director of photography (sometimes shortened to DP or DOP) is the chief over the camera and light crews working on a film, television production or other live action piece and is responsible for making artistic and technical decisions related to the image.

Wes Anderson and Robert Yeoman

Robert Yeoman’s style in Wes Anderson’s films consists of using colour palettes to highlight the colours of the set and costumes. Anderson and Yeoman shoot the movies with film stock anamorphic lenses, soft lighting, and theatre-like compositions, giving the distinctive visuals on which Anderson’s films are known for.

Robert Yeoman has filmed all of Wes Anderon’s feature films, helping him craft the visual language that has made the director famous.

Any Wes Anderson movie has overhead shots, well-dressed characters with pastel colour palettes, often centre framed shots, tracking shots, whip panning and a slow-motion ending. I re-watched The Grand Budapest Hotel and the cinematography aspect of this film was extraordinary.

Aspect Ratio:

The first thing I noticed when watching the movie was the aspect ratio change. For the scenes taking place in the 1980s, the aspect ratio is 1.85:1 and this is how the movie begins. Then we move back in time to the 1960s and the aspect ratio changes to 2.35:1. The central story that took place in the 1930s is shown in a 1.37:1 ratio. Each period of time is presented using the ratio that could have been used in a movie at the time.

1.1851
1.85:1 (1980)
2.2351
2.40:1 (1960)
3.1371
1.3:1 (1930)


Colours:

The two timeframes are lit differently. For the ’30s, there are more pink and red colours and a bit harsher light. For the ’60s, the image looks warmer and tinted towards yellows and oranges.


Framing:

The framing throughout the movie is consistent and unique. There is a lot of symmetrical compositions and shots that are constructed to reflect the perspective of a specific character in a film. Lots of straight-on views and quite a heavy usage of wide angle lens. Shooting in 1.3:1 ratio was a completely new challenge for the director and for the DP, as Yeoman would recall.

There are Anderson’s signature centre frame shots.

centre frame shots

And some interesting shots which are quite challenging with a wider aspect ratio.

wide framing

Another interesting group of shots is the low and high angle shots captured with wide angle lens. They create a very specific point of view and are repeated many times throughout the movie.

highandlow

The last interesting visual component of the movie is the frame in a frame kind of shots, creating natural frames that are aligned with the frame. A brilliant idea.

frameinframe

Details:

What’s most impressive about The Grand Budapest Hotel is the fact that Wes Anderson created the whole world in and out. Everything that we see on screen is his creation. Starting with the newspapers, currency, bus lines and all the way to the pastry box designs.

newspaper

Some elements are barely seen in the movie, but the amount of details that the director created is overwhelming. We can freeze the frame, zoom in and read the article in the made-up newspaper.

Camera movement:

Camera movement is another trademark of Wes Anderson style and in Grand Budapest Hotel we can see the whole range of his key elements in this department. The most distinctive ones are:

  • whip pans – one of the most distinctive camera moves known from Anderson films. Most of the time it is used to change the view from one character to another. In the Grand Budapest Hotel, we can even see 180-degree pan between 2 characters on the opposite ends.
  • zooms – in critical moments we can see some extreme zooms to bring the audience right into the action.
  • track shots – oftentimes the character on screen is followed by the camera sideways.
  • tilts – coupled with wide angle lens it creates an extreme change in perspective.
  • panning during dialogues – Wes uses panning throughout dialogues scenes, end when he cuts, he usually uses straight-on and POV shots.

I might not be able to implement all these techniques in my final submission, but this inspired me to experiment and possible use in my future projects.


Cinemagraphs

Cinemagraphs are still photographs in which a minor and repeated movement occurs, forming a video clip. They are published as an animated GIF or in other video formats and can give the illusion that the viewer is watching an animation

In this music video, every clip is a cinemagraph. As you can see, the singer’s lips move but everything else surrounding her is frozen.

Romain Laurent

This LA-based French director, photographer and cinemagrapher is known for his Instagram page with moving and half-moving images.

His range of creating touches all aspects such as action shots, silly faces and mundane actions.


This might not be something I would create for my final submission. But his simple half-moving images have inspired me to be more creative and elegant in my future projects.

Live Briefs

5×5 Sequence

This task required us to create a video containing 5 clips that are 5 seconds long. As I didn’t have a clue what to do, I produced something based on that. Since I wanted to focus on the ambient sound such as train sound from the outside of the building and the typing sound, I attached an external mic to my DSLR.

I used Premier Pro to edit the video.


Time’s up

We were asked to create a video based on the theme “Time is up” in groups. We decided to do on someone who is late for the class. We used our smartphones to shoot the video.

I edited using a smartphone app called InShot.

The video could have been better especially on the elevator scene if I wasn’t standing in the front of the elevator since I am visible in the mirror, and the Subject looked at the camera which could have been avoided. I should have also added a piece of comedy music to give the video a comical effect.


Sound-based video.

Andy assigned each of us with a 20-sec clip of an audio piece and asked us to create a moving image/ video to inspired by the audio clip. I used my smartphone in a slow-motion setting.

I edited the video using Filmora. I edited in a way that the video has jump cuts when there is a cut in the audio clip.


After all these briefs, I got a more clear idea and obtained skills on how to shoot and edit a moving image/video.

Part 4: Moving Image

For this part we will be introduced to the basic concepts of digital video using DSLR cameras, explore how to shoot and compose, technical aspects, sound and editing.

We should do one among these for the final submission.

  1. A short documentary profile video of a person/character study(2-3 minutes and should include some form of interview scenario)
  2.  A short piece of moving image that is influenced by the soundtrack (2-3 minutes, it should be photographic in nature and not a music video of band members playing instruments to camera)
  3. A short “fashion or culture based film” (2-3 minutes)

Our film should have a title and end credits included, where possible use music that is copyright free or creative commons attributed so it can be shown online.


Portraiture Final

20 Street portraits:

The task for this part of the submission was to take 20 portraits of strangers ‘on the street’ with certain limitations: such as the person must be a stranger, wide range of age, gender and race, 50mm on a full frame camera, sharp at the eyes, person must not be smiling, uncropped and must have a visual consistency.

I challenged myself that I will do this on one go. No redos. And doing it alone with no one to accompany me. This will help me to break the comfort zone I am in.

The location I chose was the Water tower in front of Wales Millenium Centre at the Cardiff Bay. It was morning, so the light was from one side, so I thought I will experiment split lighting with the sun’s light source.

My position

I positioned myself there and asked the people walking by to ‘be a model for 10 seconds’ and asked to smile at first and not smile for the second shot. 9 out of ten people agreed to do so. Like Platon’s approach with his subjects, I spoke to them, asked how was their day so far/ what’s their plan for the weekend and set them (and myself) at ease. I completed this just within an hour.

rawstreetAs you can so, the background is fixed for visual continuity. And I got close to them, just a couple of feet away from the subjects. But the lighting kept changing since the clouds were passing by. So some of the images where ‘overexposed’ or too bright. A couple of images were not sharp in the eye, or too close. On the whole, I am satisfied with what I have taken.

After a little bit of tweaking, this is my contact sheet of final 20 for the street portraits submission:

AB_Portraits-page-001

I thought this will be a challenge for me, but I really enjoyed doing this brief. I interacted with all my subjects; a few gave me their email address so that I could send them their images. The challenging part was the passing clouds which altered the lighting, I didn’t want to change the position since I at least wanted to maintain the visual continuity all through (including the reflections of the building at the background, and the split lighting). With the skills I achieved through this brief,  I hope to get opportunities to do more portraits in the future.


Pastiche:

Screenshot 2019-04-20 at 11.26.45

I chose to emulate this portrait by Joe McNally. This is a perfect example of a low key portrait, which was quite challenging.

The background needs to be darker, and the clothing needs to be a darker tone, not necessarily black. The absence of colours and patterns are a key element to these portraits. The lighting is set to create a dramatic effect.

I guess the lighting in this portrait is one simple lighting over the photographer. Since the lighting on his face is a bit softer, I assumed McNally used a white translucent umbrella attached to the studio lighting.

rep
My guess on the lighting of the portrait using http://www.lightingdiagrams.com

pasticheCS

I changed the position of lighting, height-wise, to get almost the accurate lighting of the original and almost succeeded. Again, I challenged myself that I would do it myself so that I get a first-hand experience with lighting and helped me to study and utilise the studio lighting properly. The practice pastiche session from before helped me to understand, so I wanted to test my skills. I chose this image for the final submission as it is a close copy of the original.

AB_Pastiche


Environmental portraiture:

The environmental portrait is an image ABOUT someone, not just OF someone. Our task was to take 2 environmental portraits; One with artificial lighting and one with natural light.

I myself am a fitness enthusiast. So I wanted to photograph someone who is a fitness enthusiast or a fitness trainer. The gym I go to have employed two new fitness trainer so I approached them to be my subjects.

Controlled lighting:

My first subject is Maria. She is a theatre and drama graduate who changed her career path to a personal fitness trainer.

I went for a simple studio setup with a portable flash kit attached to a translucent umbrella over my head.

IMG_1363

MariaCS

We went for different poses and changing the gym equipment around her. The first line of images where I have underlined in red wasn’t as I expected but the ones on the third row came as I expected. I made her stand/ sit facing against the wall since the wall gave a dynamic to the image, and surround herself with weights so it shows she works at the gym and she herself is a fitness enthusiast.

I haven’t done much post-production apart from straightening the image and correcting the lens distortion. And this was the final image for environmental portraiture with controlled lighting.

AB_EnvironmentalPortrait01

Natural lighting:

I chose a different subject for this. Tara also works at the same gym as Maria. She is a geography graduate who changed her career path to a personal fitness trainer.

The setup for this was: there was a glass wall where light comes in the gym studio, so she was towards it.

tara

tara-2The natural light was too dark since it was a cloudy outside So I struggled a lot working around the lightings of the gym which is on the ceiling facing downwards which tends to create a lot of shadows on the subject’s face. So I told her to pose buy lifting the kettlebell and do a semi-squat so her top half of the body, especially her face, comes forward so there will be less shadow. I did brighten her face a little in the post-production and this is the final image for environmental portraiture with the natural lighting.

AB_EnvironmentalPortrait02


Over the course of the portraiture element of this module, I became more comfortable taking pictures of people and communicating to strangers in general than I did in Narrative. I have done a few more private shoots for the personal trainers for their Instagram pages. I have also learnt to analyse portraits done by well-reputed portrait photographers.

Harry Borden


Harry Borden has established as one of Britain’s most demanded portrait photographer., shooting up to 150 commissioned works a year for editorial clients. His long term personal work includes projects on single-parent fathers and portraits of survivors of the Holocaust.

gettyimages-489531514-1024x1024

This striking image of Richard E. Grant was commissioned for an article for the film Withnail and I. Borden set up a temporary studio in Grant’s house, using a black backdrop mounted on poles and used a ring flash mounted around the lens of the camera. As you can see in the catchlight, Borden placed the flash below the lens to light the face. Usually, it’s considered unflattering as it creates a very unnatural direction for the light to come from, giving an eerie effect. However, it works well since he has such ‘an electric smile and great teeth’ as Borden would recall.

In a photography talk at the London Institute of Photography, he mentions that he carries a small portfolio in his phone and uses this to introduce his work. This will usually convince the subject to collaborate with him on his ideas. This portfolio almost wins the person over, but he does say that he will not make sitters to do something they don’t want to. This is brilliant advice, so for my future portrait projects I can keep a selection of my work to show at a moment’s notice, or I can change my Instagram in a way that anyone can see it is a portfolio rather than an album of images.

The qualities that you bring to a portrait are multifaceted. It is about observing people, composition and light: these are all the things that make a great photograph as well as creating a rapport with the individual ”

Harry Borden

Controlled lighting in Outdoors

During this workshop, we went to a nearby park and experimented with lighting in the outdoors. We used the basketball court as the lighting was beaming towards the fence.

We used one light source, two light sources and also reflectors.

This session helped me to understand how an extra light source in an outdoor location can change the dynamics of a portrait and also made me figure out what kind of environmental portraits I can do in my future projects, maybe in sports; since, as far as I know, these kind of portraits are really common in outdoor sports. But I would love to do these sort in other fields as well.